Category Archives: Muffins & Cupcakes

Zucchini Corn Muffins With Cheese

Zucchini Corn Muffins With Cheese

Hello everyone!

Today I have something for you, that I have never made or even tried before then:

Zucchini Corn Muffins with Cheese by www.gingerlemonandspice.com

CORN MUFFINS!

I saw corn muffins or bread on different blogs and it always looked so yummy with it’s light brown top and golden color! I know that they are/it is often eaten with chillis or other warm comfort dishes, so I needed to try!

With what do YOU like to eat your corn muffins or corn bread?

Zucchini Corn Muffins with Cheese by www.gingerlemonandspice.com

These ones of course have a special little twist. They have shredded zucchini in them, which makes them a little healthier!

Since my mum forgot to pick a zucchini in our little backyard it grew quite big – like REALLY big. I haven’t seen one this big before!! It was like a baseball bat, but about three times as thick!!

I didn’t have my camera on hand (big mistake 😉 ) so I don’t have a picture, but please just believe me when I tell you – this thing was enormous!!

I googled and searched all my sources to find recipes to use up my zucchini monster. And this is one of the recipes that has made it to the final list! (which means, there will be more! *wink* 😉 )

I adapted this recipe from Two Peas and their Pod and I am quite pleased how they turned out!

Zucchini Corn Muffins with Cheese by www.gingerlemonandspice.com

I hope you give them a chance! Have fun baking!!


Zucchini Corn Muffins With Cheese
 
Prep time
Cook time
Total time
 
A yummy side for any chilli! Or simply perfect as a snack.
Author:
Cuisine: American
Serves: 12
Ingredients
  • 1 cup buttermilk
  • 45g (3 tbsp) butter, melted and cooled
  • 3 tbsp canola oil
  • 2 large eggs
  • 150g (1 cup) flour
  • 120g (1 cup) corn flour
  • 4 tbsp sugar
  • 2½ tsp baking powder
  • ¼ tsp baking soda
  • ½ tsp salt
  • ½ cup shredded zucchini, liquid squeezed out
  • ½ cup corn kernels (frozen or canned)
  • 1 cup shredded Cheese (I used Gouda)
Instructions
  1. Preheat the oven to 300°C (400°F). Line the 12 molds of a muffin pan with paper cups.
  2. In a bowl mix eggs, buttermilk, melted butter, and rapeseed oil until well blended. Add flour, corn flour, sugar, baking powder, baking soda, and salt and mix well but start slow.
  3. Fold in zucchini, corn and cheese and divide the batter evenly between the 12 molds.
  4. Bake for 15-20 minutes in the oven until the tops are golden and a skewer inserted into the center of the muffins comes out clean. Let the muffins cool for 5 minutes then remove them from the pan and serve.


Zucchini Corn Muffins with Cheese by www.gingerlemonandspice.com

See you soon,

xoxo ~Kathrin

Cherry Bakewells

Cherry Bakewells
Cherry Bakewells

Hello everyone!!

How was your summer so far? At least in Germany it doesn’t feel like summer at all – it is quite cold and rainy at times. The few hot days we had are already weeks ago and I didn’t have any time then to go to an open air pool or do something else summery 😉

So please tell me you had a great summer and make me jealous!! 🙂

Cherry Bakewell Tarts by ginger, lemon and spice


What I have for you today is my recipe for homemade Cherry Bakewells.

Sharing this recipe with you feels like letting you in on a very big secret!!

I still can remember when I had my first Cherry Bakewell ever – it was during my Au Pair stay in Ireland. The family I stayed with had them at home one day, in their box, looking very pretty with the thick white icing and the shiny little glace cherry on top. I have never seen anything like those little tarts in German stores, I guess nobody really had enough patience to produce such little pastries in masses for a store to sell! 🙂

So I went ahead and tried one – rich and sweet softness, a buttery pastry outside with a moist filling with berry flavors and just a hint of almond! I fell in love right there and then!!

Cherry Bakewell Tarts by ginger, lemon and spice


And now, every time I go back to Ireland (which is quite often as you may have read herehere or here) I just HAVE to buy at least one box of Cherry Bakewells to eat right there or take home with me. They are the perfect little treat and spend sweet comfort and utter satisfaction. The only problem is, or at least was, that I couldn’t find them anywhere in Germany and the ones I took home from Ireland where gone all too quickly!

Cherry Bakewell Tarts by ginger, lemon and spice


I dreamed about making them at home for soo long and finally having them recreated I can say it was a lot easier than I thought!! Of course, it takes some time, and shaping the pastry cups needs some practice but by the end the result – holding my own homemade Cherry Bakewells in my hands and knowing that I can now have them any time I want –  was totally worth it!!

And as an added bonus: They freeze perfectly!! I just popped them in a reclosable freezer bag and whenever I felt the urge of a little comfort in sweetness I just took one or two out and let them come back to room temperature. This only took about 2 hours and they tasted just perfect!

Cherry Bakewell Tarts by ginger, lemon and spice


Cherry Bakewells
 
Prep time
Cook time
Total time
 
Perfect little homemade Cherry Bakewells that taste even better than the store bought ones!
Author:
Recipe type: sweet pastry, little cakes
Cuisine: English/Irish
Serves: 12
Ingredients
Pastry:
  • 225g (3x ⅔ cups) flour
  • 150g (2/3 cup) butter, softened
  • 1 Tablespoon sugar
  • 1 egg yolk
  • cold water as needed
Filling:
  • 12 Teaspoons strawberry jam (I used homemade strawberry & elderflower jam)
  • 50g (1/4 cup) butter, softened
  • 50g (1/4 cup) sugar
  • 1 egg
  • 50g (3/8 cup) ground almonds
  • 50g (3/8 cup) flour
  • ¼ Teaspoon of baking powder
  • a few drops of almond flavour or essence (we have Bittermandel-Öl in Germany)
Icing:
  • 175g (1½ cups) icing sugar
  • 1-2 Tablespoons of water
  • 12 glace cherries
Instructions
Pastry:
  1. Rub butter into flour and sugar until it resembles fine breadcrumbs.
  2. Add the egg yolk and cold water one teaspoon at the time until dough comes together.
  3. Wrap in cling film and store in fridge for at least 30 min.
  4. Meanwhile prepare your muffin tin by greasing all molds with butter or margarine.
  5. Take dough out of the fridge and devide into 12 portions. Line the muffin molds with pastry dough by rolling every portion into a circle big enough to fill it or devide each portion into 2, shaping one into a snake that covers the sides of the muffin mold and one into a ball and press it down to form the bottom. Shape the dough with your fingers into pastry cups.
Filling:
  1. Preheat your oven to 180°C.
  2. Spoon 1 teaspoon of strawberry jam (or any other kind you like) into each pastry cup.
  3. Cream together butter and sugar until fluffy. Add the egg and mix until well incorporated.
  4. Put flour, baking powder, ground almonds and almond flavour into the bowl and stir well.
  5. Devide the mixture between the 12 pastry cups and make sure that the jam is completely covered.
  6. Bake your Cherry Bakewells for 20 minutes until golden.
  7. After taking them out of the oven press the filling mixture softly back down again with the back side of a spoon to form a little mold for the icing. Let the bakewells cool down before taking them out of the muffin tin.
Icing:
  1. Mix icing sugar with the water (don't put it all in at once, just add little by little until you have a thick white glace) and spoon on top of the bakewells. Top each tart with a glace cherry as long as the icing is still wet.
  2. Let the Cherry Bakewells completely cool down and enjoy!
Notes
They freeze very well - just take them out of the freezer and let them come back to room temperature!

Cherry Bakewell Tarts by ginger, lemon and spice

What are you waiting for? Get Baking!! 🙂

Love,

~ Kathrin

Caramel Maple Bacon Cupcakes

Caramel Maple Bacon Cupcakes

Hey people out there!!

Caramel Maple Bacon Cupcakes by gingerlemonandspice

Today I have something very special for you: CARAMEL MAPLE BACON CUPCAKES!!!

Yeah, they HAVE to be written in capital letters, they are just soooooo good!!!

When I first stumbled upon the recipe I thought immediatly of my brother. He is a very big fan of maple sirup – and all things meat of course! He enjoys preparing different meats on the grill and in the oven like low temperature grilled pulled beef or lamb or turkey… That is kind of his greatest hobby!

Caramel Maple Bacon Cupcakes by gingerlemonandspice

So last week was his birthday and I took the chance and made those delicious Caramel Maple Bacon Cupcakes for him. At first I was quite shocked that the recipe made 24 instead of 12 cupcakes – but it was too late by then. So I made all those 24 cupcakes and thought I would just see what happens.

Caramel Maple Bacon Cupcakes by gingerlemonandspice

Snapshot of my little cousin and my brother’s girlfriend making friendship bracelets at the party

And it was unbelievable!!  At first everybody was a bit skeptic by the combination of flavors, but then they all liked it very much! The next day I was told by one of the sleepover guests, a friend of my brothers, that he even ate 3 at the party and asked me for one more for breakfast 🙂 Best compliment ever!! 😀

Most of them were gone by the next day, I think there were like 5 or 6 left, but not for long. I am sorry for all the exclamation marks I use but I just feel sooo enthusiastic about those cupcakes!!

DSC_0021


Caramel Maple Bacon Cupcakes (makes 24)

Ingredientes:

Muffin:

225g (1 cup) butter, softened

225g (1 cup) sugar

4 large eggs

360g (3 cups) all-purpose wheat flour

1 tablespoon baking powder

1 teaspoon salt

1 cup milk

1 package vanilla sugar (or 1 teaspoon vanilla extract)


Caramel Maple Frosting (makes a lot – I even used the rest for the dessert we ate at our family easter lunch):

225g (1 cup) butter

340g (1 1/2 cups) brown sugar

1/2 cup evaporated milk (Kondensmilch)

1/4 teaspoon baking soda

400g cream

6 packages whipped cream stabilizer (Sahnesteif)

1/2 cup maple sirup


300g bacon slices


Directions:

1. Preheat oven to 170° C (350° F). Beat butter and sugar in a bowl with an electric mixer until creamy. Add the eggs, one by one, beating after each one until incorporated.

2. Add flour, baking powder and salt to the bowl and mix the dry mixture on top a bit with a spoon. Add the milk and vanilla to the bowl and begin to mix slowly with your electric mixer. If the slowest speed of the mixer is too high start mixing by making circles with the mixer without turning it on.

3. Put paper baking cups into 2 (12-cup) muffin tins, or do only 12 at first if you only have one tin like I did. After the first ones are baked, remove the muffins and bake the second ones. Spoon the batter into the cups until about two-thirds full. Bake for about 15 minutes or until wooden pick comes out clean. Put the Muffins on wire racks to cool completely

4. For the frosting melt the butter over medium heat in a pot on the stove. Choose one that is a bit bigger because the batter will rise  about double the size. Add brown sugar and stir constantly. Bring to a boil and cook for two minutes. Don’t forget stiring!! Then add the evaporated milk. When everything is incorporated add the baking soda, stir and cook for 1 minute. The batter will double in size! Then remove the pot from the heat, put a lid on top and let cool completely.

I did everything until this step on the day before my brother’s birthday so the frosting had time to cool overnight.

5. Transfer the caramel mixture to a big bowl. In another bowl beat the cream with the whipped cream stabilizer until very stiff but it’s not butter yet. Now take your electric mixer, add maple sirup to the caramel and beat the mixture for 5-10 minutes until the color changes and it looks whipped up. You don’t need to clean the stirrers when you change from the cream to the caramel. Then add the whipped cream and mix until just incorporated. The frosting should be thick enough now to hold together! If you have problems you could still add more whipped cream stabilizer.

6. Pipe the frosting onto the cupcakes and decorate with the bacon bits. The taste-testers later told me either they didn’t need the bacon at all or they would have wanted to have more bacon. So choose whatever you want 😉 In my opinion it could have had more bacon!

7. Enjoy! and if you want – share with some special friends!

Recipe adapted from MyRecipes.com

Caramel Maple Bacon Cupcakes by gingerlemonandspice

and just one last one more 🙂

Caramel Maple Bacon Cupcakes by gingerlemonandspice

~Kathrin

Apple Rose Muffins with Marzipan and Walnuts and the self critic in me

Apple Rose Muffins with Marzipan and Walnuts and the self critic in me

Hey there!

Another day, another time, another meal. What are you up to?

Apple Rose Muffins with Marzipan and Walnuts Recipe

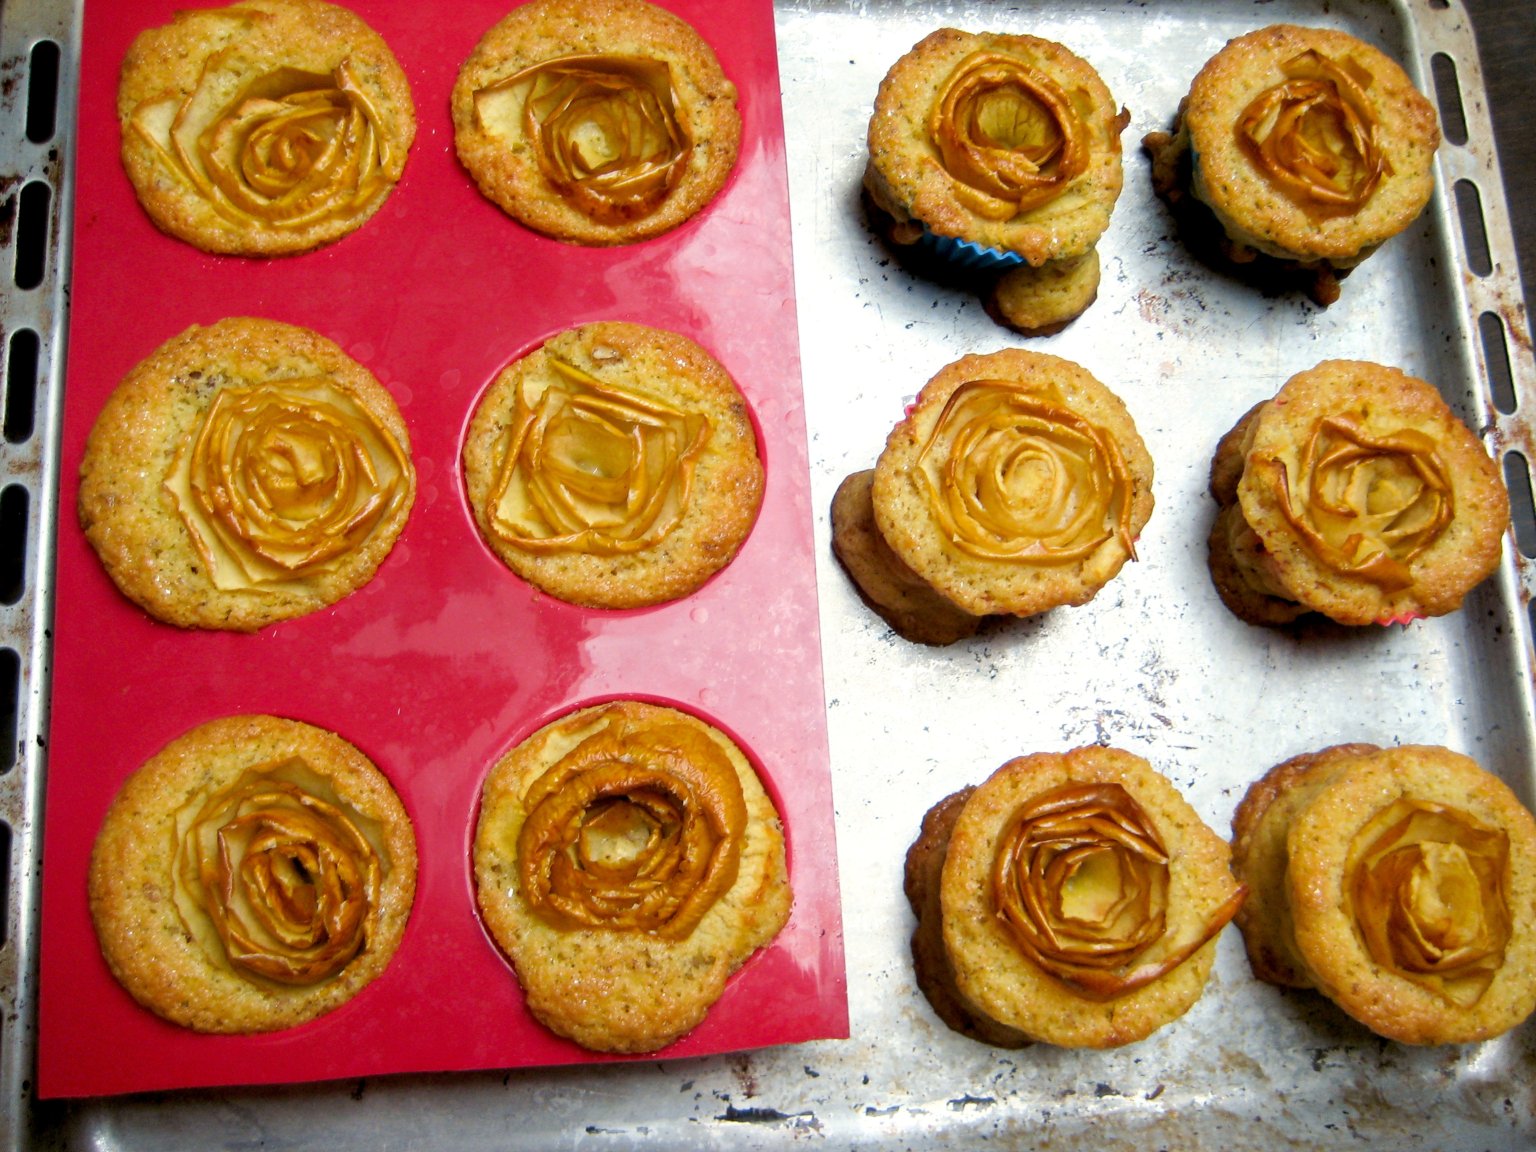
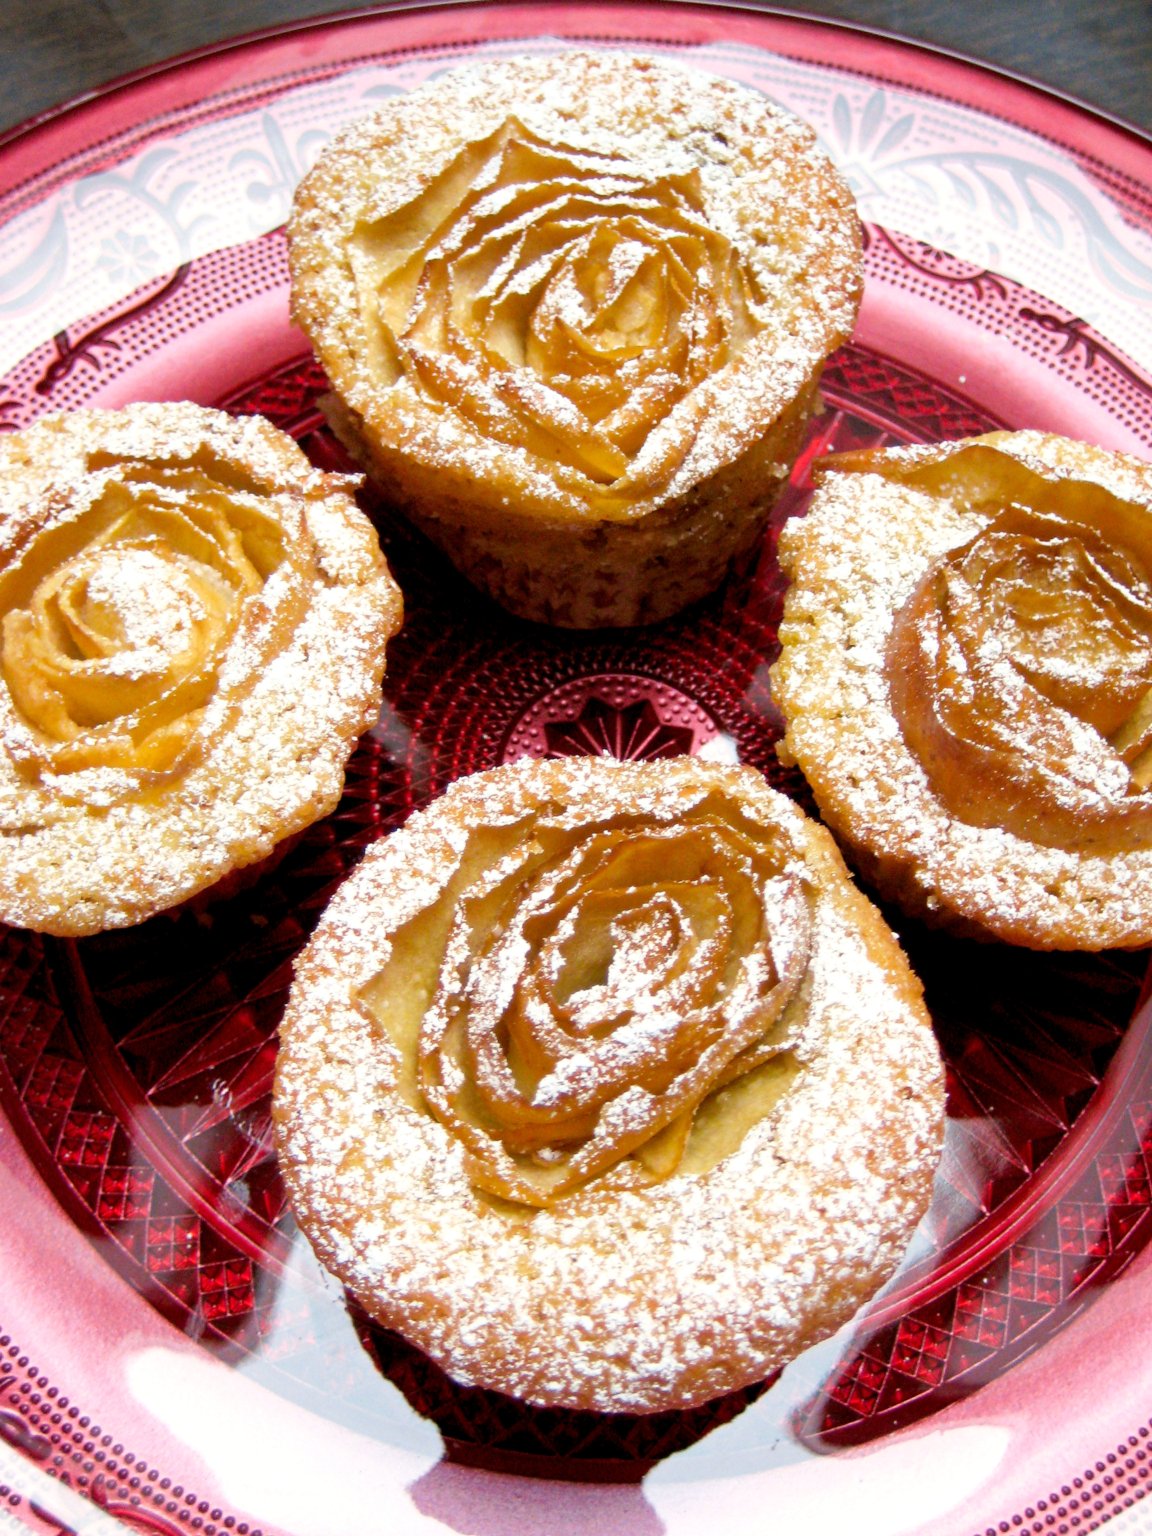
The ones of you, that follow me on facebook have already seen what I did yesterday. I made roses out of apples and put them on muffins!! Majorly cute!! 🙂

I couldn’t wait sharing!! Even if the dough is not exactly what I dreamed of.

You see – I’m a big self critic. One time my brother said something to me, which is sooo true – and what hit me again when I was sharing those muffins. You must know, we are all food lovers. We really like to cook, bake and prepare delicious food, especially for other people!! We get creative together, alone or talk about stuff we want to try out. Very important for us is to do things the old fashioned way. To work with our hands to create something incredible and then share it with others! We want to know how to make the food we eat on our own, and not just buy a package of perhaps premade lasagne at the store. My father has designed and built a wooden fired oven in our backyard which we use to bake his handmade sourdough bread, make a pizza party or bake cakes. My brother likes to do different kind of meat roasts and my mum does the side dishes like traditional sauerkraut or so. You see – it is kind of a family hobby 😉


So what my brother said to me was: When we share our food with someone, and that someone tells us it tastes great, we can’t really believe it. There hast to be at least a little bit of criticism for us to believe that the other person really is honest!


And this was soo true this time again. For me the muffins were a bit too crispy, it is not a really cakey dough. But I hadn’t even tried them myself! I just nibbled on a bit of dough that was overflowing during baking. So when I was told, that they really liked the muffins, I was very skeptical and had to ask if it wasn’t too crispy and stuff.

BUT WAIT – Why am I doing this? I worsen my own creation by myself?! Isn’t there a false to this logic??

I am sure there is!! I definitly have to learn to accept when somebody is liking what I did. Just like that. And not look for mistakes myself! It makes myself just feel worse, with now real reason…

Apple Rose Muffins with Marzipan and Walnuts Recipe

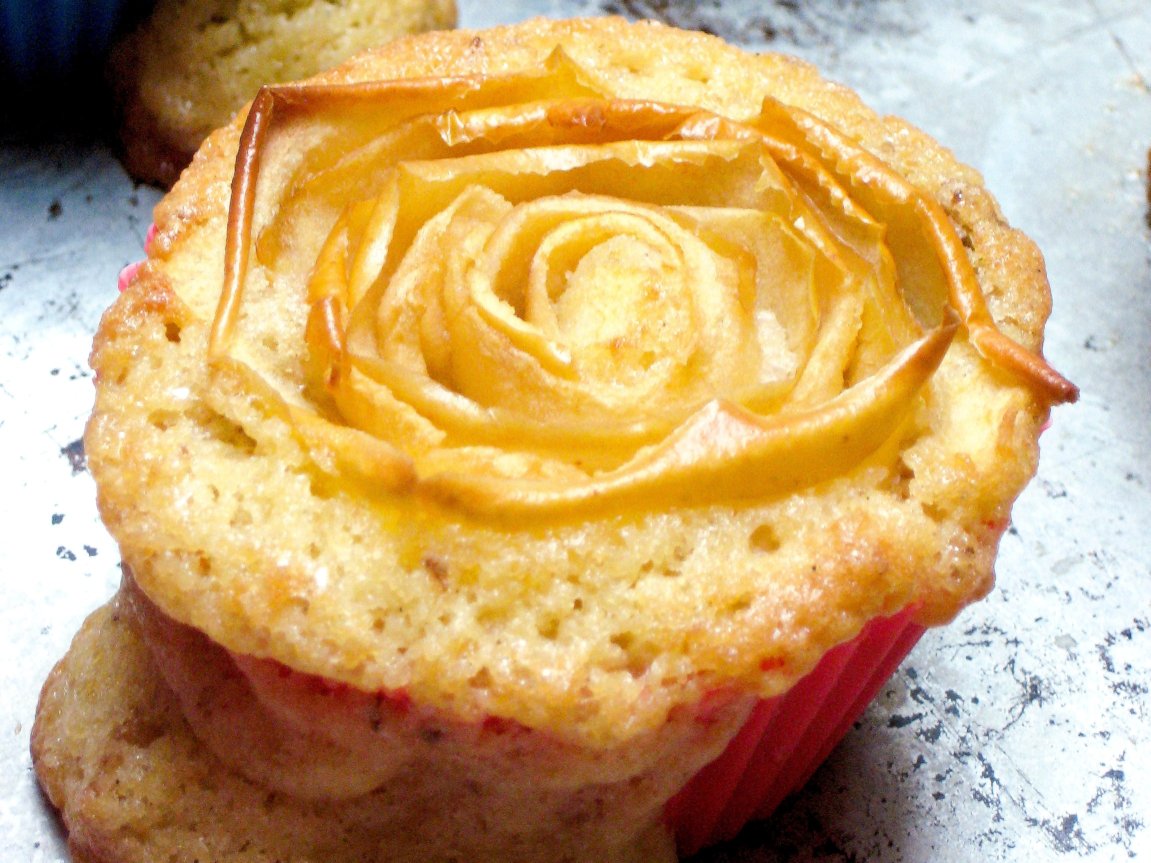
Dear reader, i hope your still with me. Those muffins definitily deserve a chance! They look soo pretty with the roses on top! And they acutally were quite good. Not the way I imagined when I first judged over them without even trying myself 😉 There not the best muffins I ever ate, but they still are very good! Have fun trying out the roses technic and don’t give up too early. It is not so hard once you found out how!

And off we go:


Apple Rose Muffins with Marzipan and Walnuts

Recipe of dough adapted from Kawaii Kitchen

Apple Rose Muffins2

Apple Rose Muffins5


Apple Rose Muffins4

Apple Rose Muffins6.1


Ingredients:

100g butter at room temperature

150g sugar (I used homemade vanilla sugar)

3 eggs

150g flour

1/2 package baking powder (about 8g)

40g chopped walnuts

Filling:

50g marzipan (optional)

6 apples (you need mostly the skin, so keep in mind you have to do something else with the flesh)


Directions:

1. Preheat oven to 170°C. Whisk butter in a bowl with a hand mixer until creamy then add the sugar and whisk some more.

2. Add the eggs, one by one.

3. Put flour and baking powder in your bowl at the same time and mix slowly just until incorporated. Fold in walnuts.

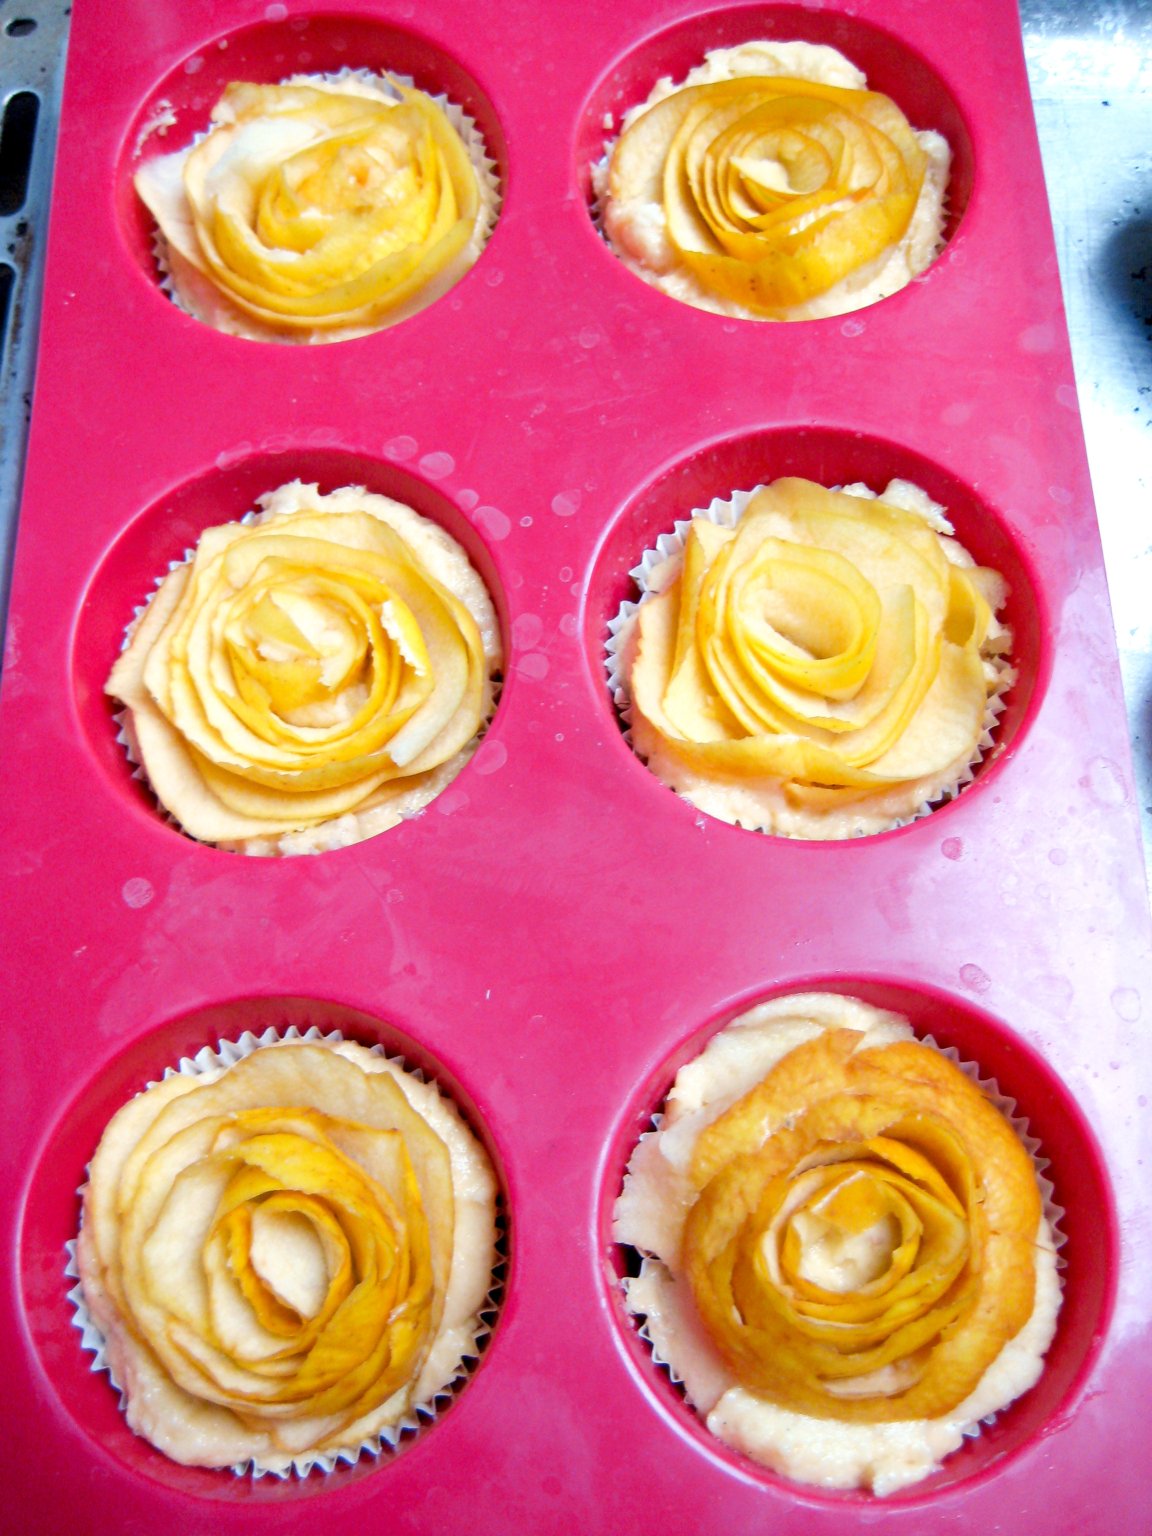
4. Put a bit of batter in every of the 12 molds of a buttered muffin pan or one lined with muffin papers. Divide marzipan into 12 pieces and put them in the middle of the dough. Divide the rest of the batter equally between the 12 molds.

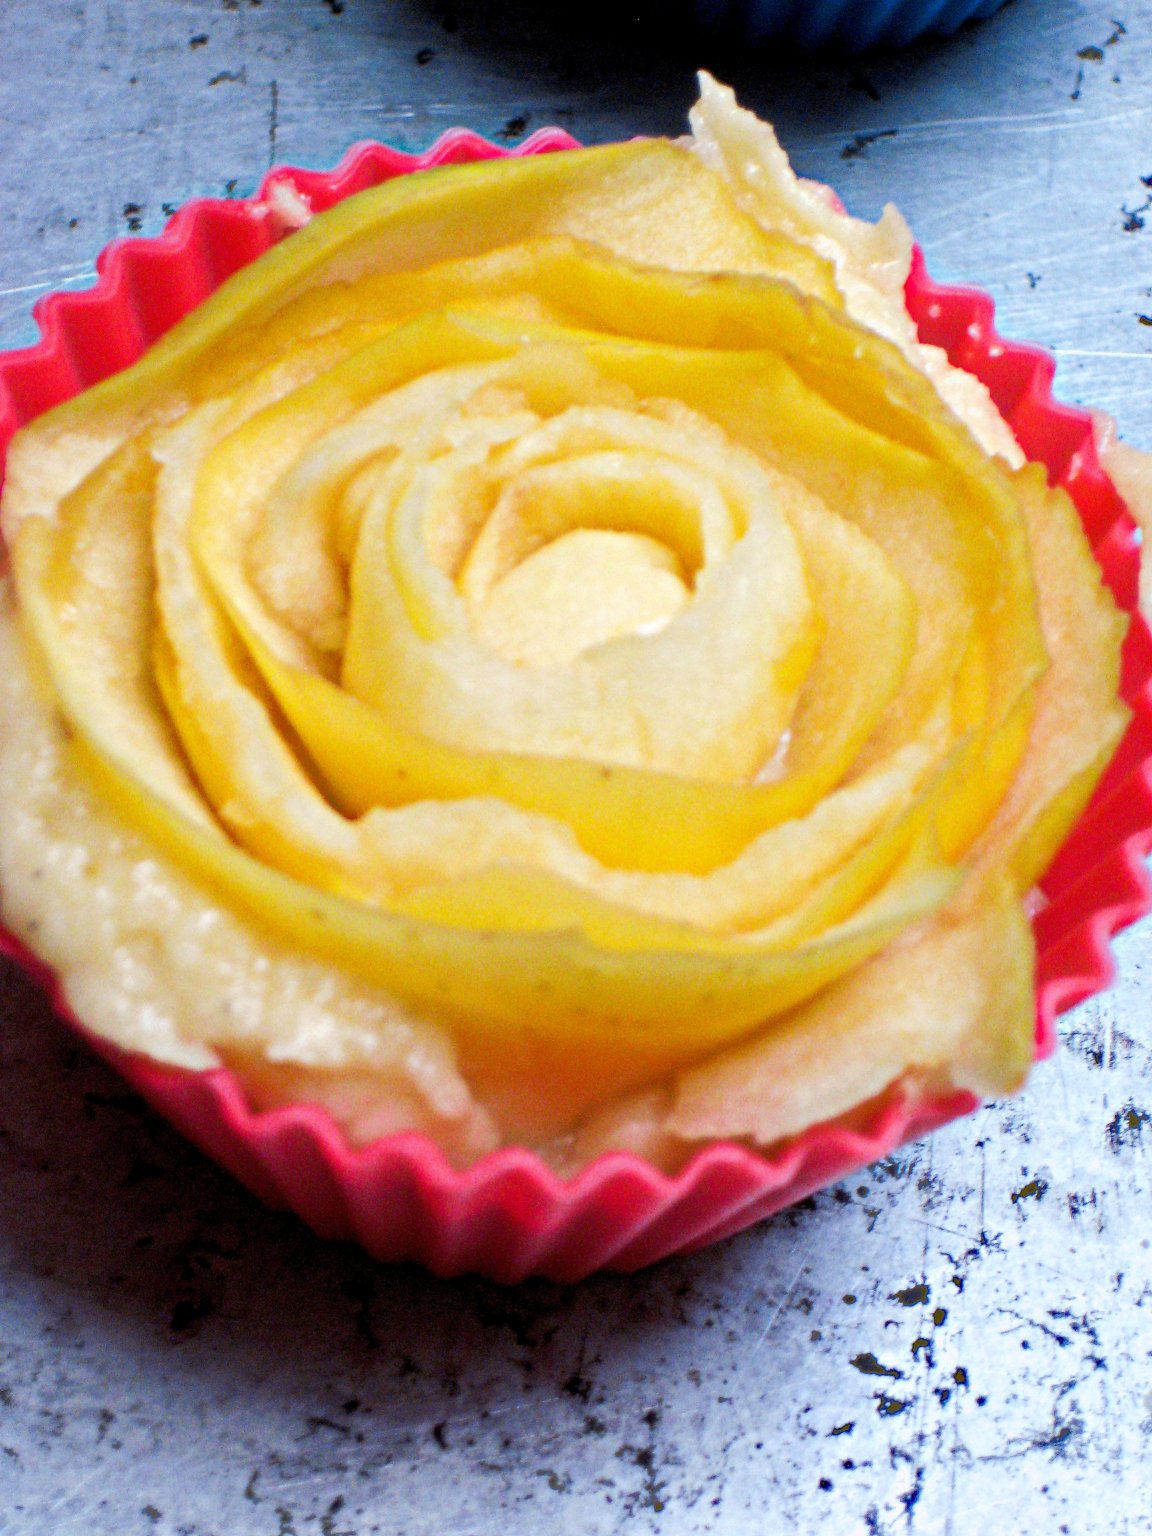
5. Now the apples: wash and dry them. Start peeling the first apple from the very top near the stem with a peeler. Try to make stripes with half skin half flesh and try not to brake them. You can make roses for two muffins with one apple (depending on the size). Roll the stripe in a circular motion, the part of the stripe with the skin should be on top. Put the rose on top of the muffin, don’t press it down too much because the dough will rise a lot.  For the second rose of the first apple start peeling from the bottom to the ‘equator’ of the apple. Don’t be scared! It just needs a little bit of practice. But the cute look is sooo worth it!! If your stripe cracks that’s no problem, just make a rose of the parts. Happened to me too 😉

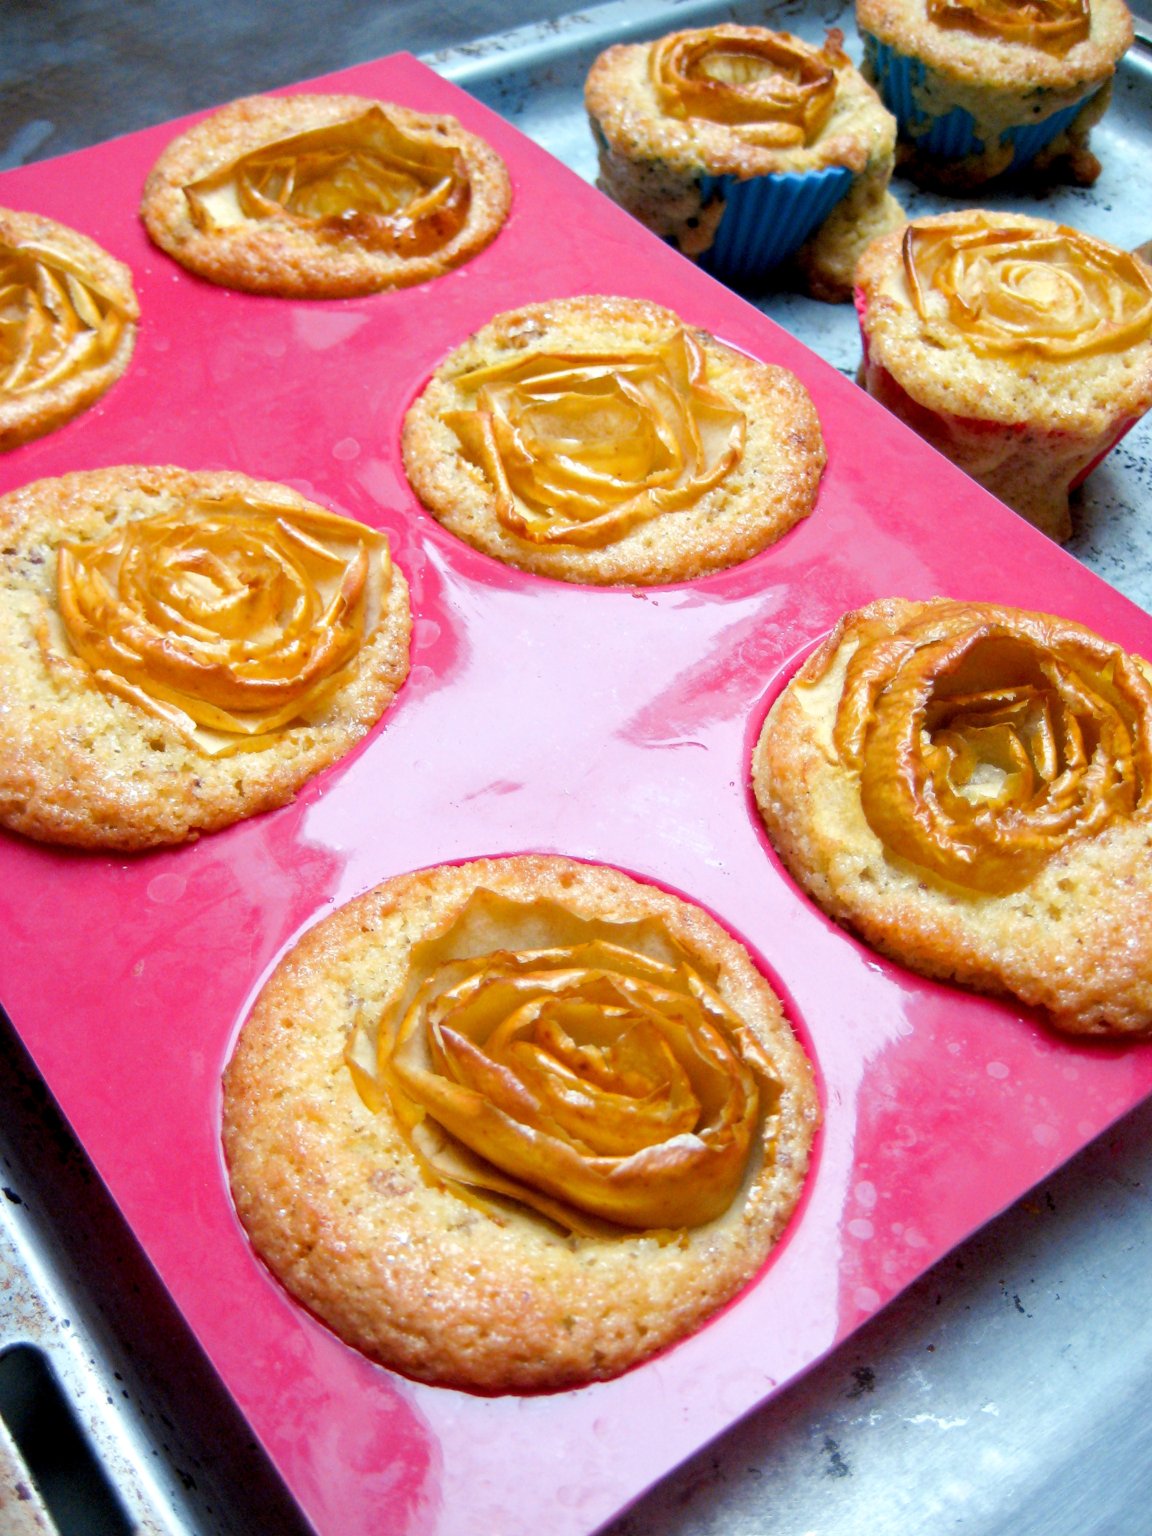
6. Put the muffins into the oven and bake for 30-35. min.

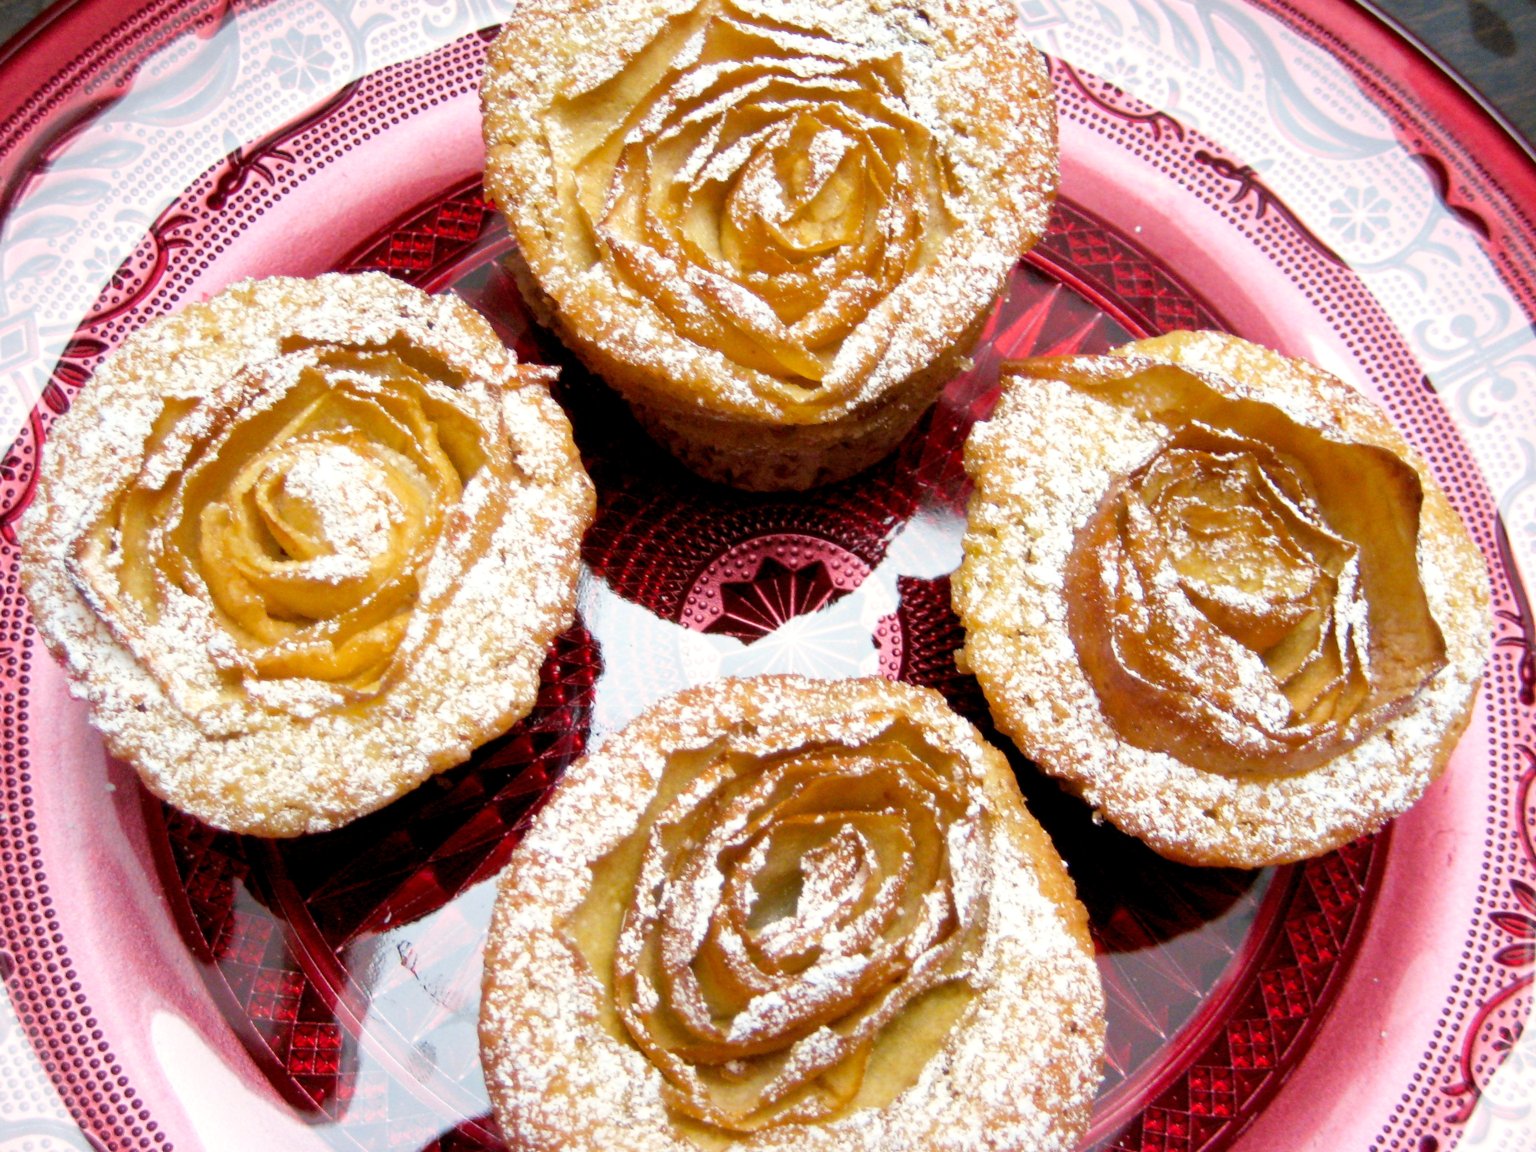
7. Dust with powdered sugar if you like. Enjoy!!

Apple Rose Muffins7

I am sorry that I don’t have step-by-step pictures. It was because I was not sure if they turned out well, and I was occupied with the technic myself. 😉 But as there was already a request for the recipe I thought I couldn’t keep you waiting!! I will definitly make those again and maybe do a proper tutorial. If you experience any difficulties or have any questions, just ask!!

Apple Rose Muffins1.1

What to do with the rest of the apples? What I did was a compote with apples, green seedless grapes, freshly pressed orange juice of 2-3 oranges and a little bit of vanilla sugar. We had this plain as a dessert! But I imagine it would be great with joughurt, rice pudding or semolina porridge too.

Apfelkompott

~Kathrin

Orange Ricotta Chocolate Chip Muffins

Orange Ricotta Chocolate Chip Muffins

A very warm WELCOME to all my new readers!!

IMG_9474-1

I am sooo excited that you all joint me here and on facebook to follow my little blog! This blog is my heart’s desire and I love to bake and cook, tell my story, photograph and sew to make this blog a part of me and a nice place to be! And this is true, even if it rhymes 😉

For everybody that stumbles on this little site and especially the ones who decide to stay I am soooo very thankful!! It is so nice to see that other people like the same things I do and that encourages me very much!

I would like it best if I could get to know all of you personally, but as this is a very difficult task because you are living all over the globe, I encourage you to leave a quick comment! Don’t be shy! 🙂


Today I want to talk about muffins. Aren’t they great? You can bring them to any celebration and they are never out of place. People love them because they are already in single servings and can be transported easily! But most of all: They taste great!!!

If you have a muffin for yourself, it is just like you have a little cake baked just for you. They are cute, they are easy to make and simple to modify!


What I have here is a recipe which is loaded with a bright orange flavor, rich chocolate taste and is very moist thanks to the use of ricotta!

I used homemade ricotta which I made of the leftover whey I had from making my own camenbert and feta cheese. Also the only oranges I had were blood oranges! That is why the dough had a pretty rosa color and the baked muffins where a light green on the inside, because the color changed from rosa to green during baking.

I was very surprised when I had a bite of my first muffin! And they really tasted very delicious!!


So here it comes:

Orange Ricotta Chocolate Chip Muffins

from two peas & their pod

IMG_9457-1

IMG_9460-1


IMG_9461-1

IMG_9469-1


Ingredientes:

115g unsalted butter, at room temperature

150g granulated sugar

Zest of 1 orange

15 g vanilla sugar (or use 1 teaspoon vanilla extract)

1 cup ricotta cheese

1 large egg

4 tablespoons fresh orange juice

240g white flour

1/2 teaspoon baking powder

1/2 teaspoon baking soda

1/2 teaspoon salt

1 cup chocolate chips (I used 125g chopped ‘Kouvertüre’ chocolate, but choc chips are fine)

Glaze:

1 cup powdered sugar

1-2 tablespoons orange or lemon juice


Directions:

1.Preheat oven to 180° C (about 350 degrees F). Line 12 muffin cups with paper liners, or use silicone cups. Set aside.

2. Beat the butter, sugars and zest with an electric mixer until light and fluffy. Add ricotta cheese and mix well. Then add the egg and orange juice.

3. Now it is time to put in the dry ingredients. Flour, baking powder and -soda and salt go in. Don’t overmix! Just stir it in on low speed of the electric mixer.

4. Add the chocolate and just mix it in with a big spoon.

5. Using two large spoons divide the dough between the 12 muffin moulds.

6. Bake muffins for approx. 25-30 minutes. Take a skewer and make the test! If it comes out clean, they are ready!

7. Now prepare the glaze.  In a small bowl whisk together the powdered sugar and the citrus juice (not all at once, check consistency!). Drizzle over the muffins. Let it sit until glaze hardens and muffins are cooled down.

Enjoy!!


~Kathrin


IMG_9483-1