Category Archives: Cakes and Sweet Breads

What I was up to in November

What I was up to in November

Hello everyone!

It has been a busy month for me, getting a part time job at a store that sells home decorations, gifts and household items, singing solo on both a wedding and my gospel choir’s winter concert and most of all preparing and creating my first wedding cake ever!!

My First Wedding Cake by gingerlemonandspice.com


Baking a wedding cake has been on my bucket list for quite some time now, but I never thought I would do it so soon. I was sure I needed lots of practice before then, baking my way through all family birthdays and other occations and ‘forcing’ everyone to try what I created. I thought for sure there were many failures along the way, learning how to create the perfect fillings and shape the smoothest fondant finish and decorations.

But then there was this day when I heard that the most lovely couple of friends of mine that I know from our gospel choir and that had invited me to their wedding in early november had to struggle so hard with private problems and finishing their exams before the wedding date that they couldn’t go on like this anymore and decided to call of all wedding festivities.


My First Wedding Cake by gingerlemonandspice.com

My First Wedding Cake by gingerlemonandspice.com


Me and my friends from the choir were shocked that this lovely couple had to struggle so hard with problems they could do nothing about and under the direction of our choir leader it was decided that they should have their wedding party and we all help to make it happen.

Quickly there was a place found, where the festivities could take place, plans were made, a caterer found and cakes were baked. There were lots of helpers found that cleaned all the dishes, made sure that everyone had to drink and nobody had to go home hungry.

It was an enormous amount of work that especially our choir leader had to deal with ahead of the wedding day but it was all so worth it!!


My First Wedding Cake by gingerlemonandspice.com


Since I knew bride and groom already for more than 6 years, singing besides them and having great times after rehearsals in a pub nearby I knew I had to do something special and I offered to make their wedding cake. But it was all kept a secret until the moment I revealed it to them! And they were so surprised and happy, I really loved the look on their faces 🙂


My First Wedding Cake by gingerlemonandspice.com


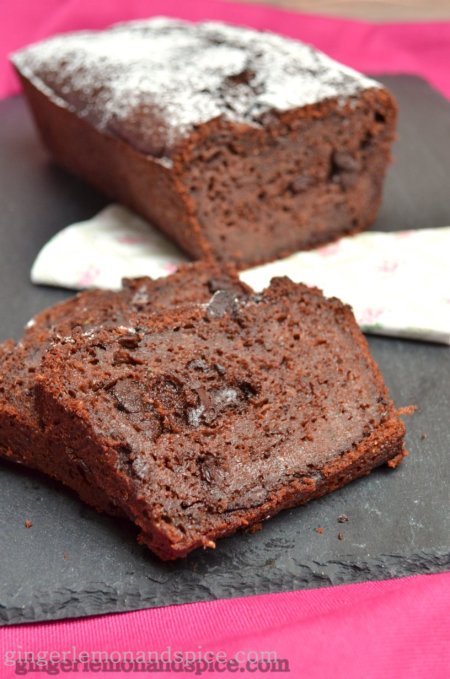
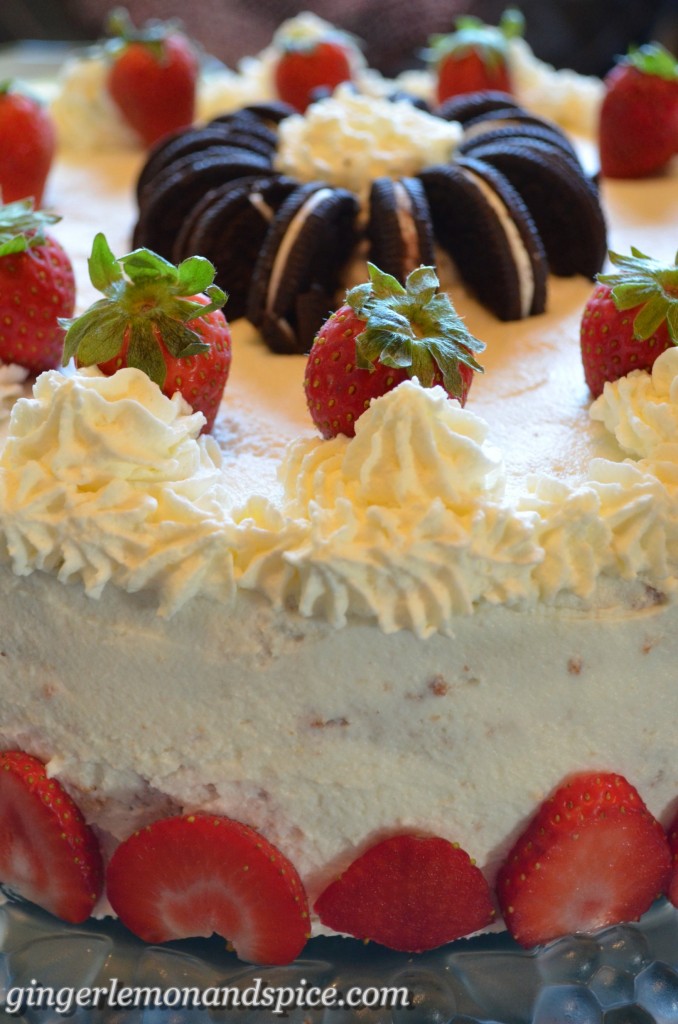
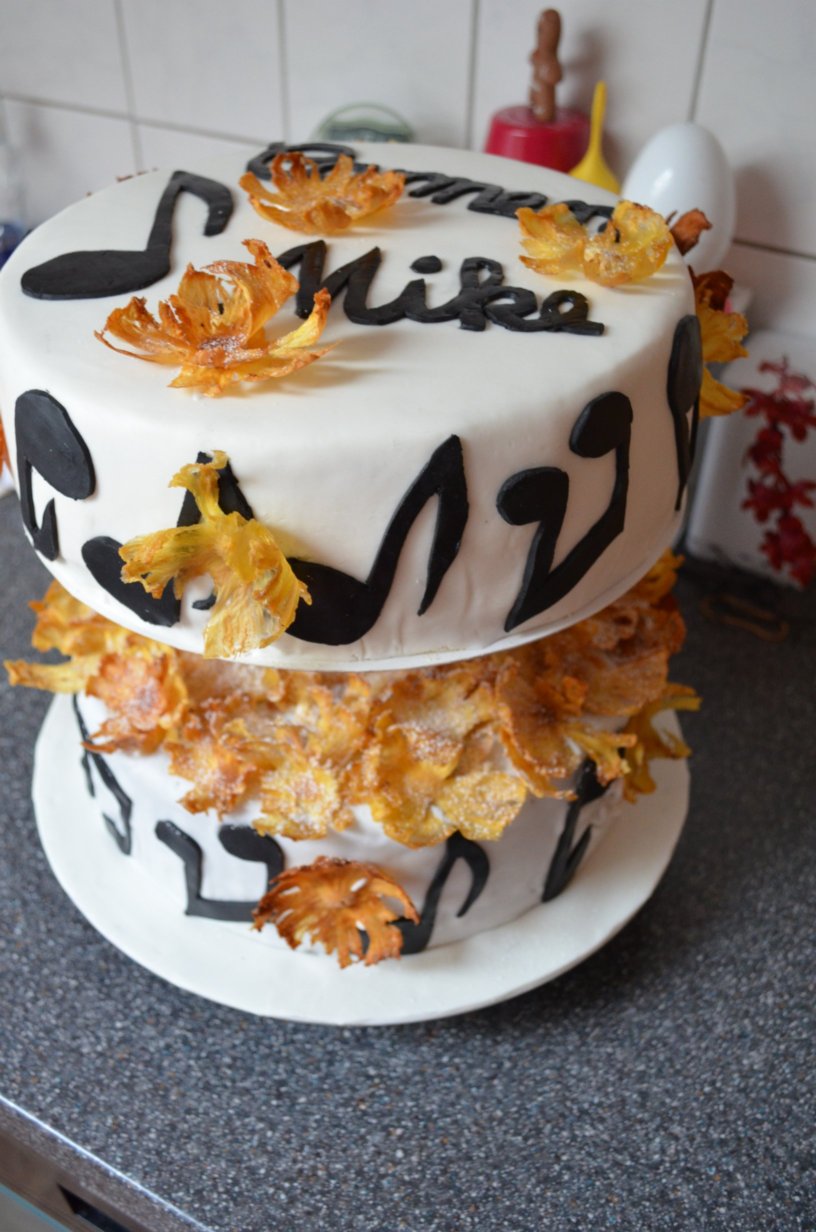
The cake on the top was a Pear & Vanilla Cheesecake and the one below was a Chocolate & Orange Buttercream Cake.

The decorations are made of black & white fondant and the flowers are dried pineapple.


My First Wedding Cake by gingerlemonandspice.com


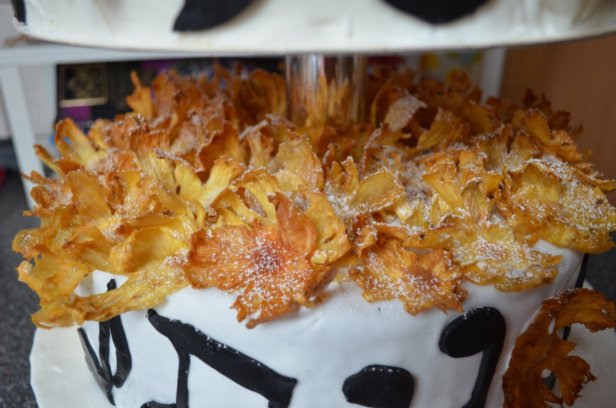
Of course being the perfectionist that I am I wasn’t totally happy with the final result but as we all helped to make this day possible and everybody helped the way they could I can say I was quite happy how it turned out! 🙂


My First Wedding Cake by gingerlemonandspice.com


I didn’t have time to set up a proper backround and think about the perfect angles to shoot the cake, so I’m sorry that the pictures aren’t as professional as the once I do usually. Also I was quite nerve wrecked on that day, singing the solo in the church and worrying the cake would make it safe and sound to the party and onto the table later that I just gave somebody else my camera and asked them to shoot a few pictures during the reveal. 😉


My First Wedding Cake by gingerlemonandspice.com

My First Wedding Cake by gingerlemonandspice.com


Thank you for reading!!


Love,

~ Kathrin


My First Wedding Cake by gingerlemonandspice.com

Double Chocolate Zucchini Bread

Double Chocolate Zucchini Bread

Hello everyone!

Double Chocolate Zucchini Bread with Yoghurt & Olive Oil by www.gingerlemonandspice.com

As promised here is the Double Chocolate Zucchini Bread Recipe with Yoghurt and Olive Oil you voted you wanted to see next!

This is another recipe I made to use up this enormous zucchini I got from my grandma’s garden. Maybe you remember my Zucchini Corn Muffins from the last post?

Very moist and with indulgend chocolate bits throughout the bread this is every chocolate lovers fantasy! Nobody would ever think that there are three (!!) cups of zucchini inside!

I did also freeze some slices of the cake and liked it still but it is best eaten fresh.

Double Chocolate Zucchini Bread with Yoghurt & Olive Oil by www.gingerlemonandspice.com

Double Chocolate Zucchini Bread with Yoghurt and Olive Oil
 
Prep time
Cook time
Total time
 
A very moist and flavorful chocolate bread that uses up a whole lot of your zucchini harvest!
Author:
Recipe type: Cake
Serves: 20 slices
Ingredients
  • 2 eggs
  • 270 g (1 cup) sugar
  • 190 g (1½ cups) flour
  • 25 g (1/3 cup) cocoa powder
  • 1½ tsp baking powder
  • ½ tsp salt
  • 80 g (1/2 cup) olive oil
  • 120 g (1/2 cup) plain yoghurt (I used 3,5 % fat)
  • 1 tsp vanilla extract
  • 440 g (3 cups) zucchini (finely grated and water pressed out)
  • 130 g (1 cup) dark chocolate chips or chopped chocolate pieces
Instructions
  1. Preheat your oven to 180°C (350°F). Butter and flour a big loaf tin (or two smaller ones).
  2. In a large bowl mix eggs and sugar for about 5 minutes until pale, fluffy and very creamy.
  3. Add flour, cocoa powder, baking powder and salt at once and mix on slow speed until incorporated.
  4. Then pour in olive oil, yoghurt and vanilla and mix through.
  5. Fold in zucchini and chocolate.
  6. Pour your mixture into your loaf tin(s) and bake for 65 minutes. Check if the chocolate bread is ready by inserting a wooden skewer. If there is still wet dough on the skewer leave it in the oven for longer. (mine needed 20 minutes more when baked in one loaf tin)

 Adapted from Give Recipe

Double Chocolate Zucchini Bread with Yoghurt & Olive Oil by www.gingerlemonandspice.com

Have a great day!

~ Kathrin

Cherry Bakewells

Cherry Bakewells
Cherry Bakewells

Hello everyone!!

How was your summer so far? At least in Germany it doesn’t feel like summer at all – it is quite cold and rainy at times. The few hot days we had are already weeks ago and I didn’t have any time then to go to an open air pool or do something else summery 😉

So please tell me you had a great summer and make me jealous!! 🙂

Cherry Bakewell Tarts by ginger, lemon and spice


What I have for you today is my recipe for homemade Cherry Bakewells.

Sharing this recipe with you feels like letting you in on a very big secret!!

I still can remember when I had my first Cherry Bakewell ever – it was during my Au Pair stay in Ireland. The family I stayed with had them at home one day, in their box, looking very pretty with the thick white icing and the shiny little glace cherry on top. I have never seen anything like those little tarts in German stores, I guess nobody really had enough patience to produce such little pastries in masses for a store to sell! 🙂

So I went ahead and tried one – rich and sweet softness, a buttery pastry outside with a moist filling with berry flavors and just a hint of almond! I fell in love right there and then!!

Cherry Bakewell Tarts by ginger, lemon and spice


And now, every time I go back to Ireland (which is quite often as you may have read herehere or here) I just HAVE to buy at least one box of Cherry Bakewells to eat right there or take home with me. They are the perfect little treat and spend sweet comfort and utter satisfaction. The only problem is, or at least was, that I couldn’t find them anywhere in Germany and the ones I took home from Ireland where gone all too quickly!

Cherry Bakewell Tarts by ginger, lemon and spice


I dreamed about making them at home for soo long and finally having them recreated I can say it was a lot easier than I thought!! Of course, it takes some time, and shaping the pastry cups needs some practice but by the end the result – holding my own homemade Cherry Bakewells in my hands and knowing that I can now have them any time I want –  was totally worth it!!

And as an added bonus: They freeze perfectly!! I just popped them in a reclosable freezer bag and whenever I felt the urge of a little comfort in sweetness I just took one or two out and let them come back to room temperature. This only took about 2 hours and they tasted just perfect!

Cherry Bakewell Tarts by ginger, lemon and spice


Cherry Bakewells
 
Prep time
Cook time
Total time
 
Perfect little homemade Cherry Bakewells that taste even better than the store bought ones!
Author:
Recipe type: sweet pastry, little cakes
Cuisine: English/Irish
Serves: 12
Ingredients
Pastry:
  • 225g (3x ⅔ cups) flour
  • 150g (2/3 cup) butter, softened
  • 1 Tablespoon sugar
  • 1 egg yolk
  • cold water as needed
Filling:
  • 12 Teaspoons strawberry jam (I used homemade strawberry & elderflower jam)
  • 50g (1/4 cup) butter, softened
  • 50g (1/4 cup) sugar
  • 1 egg
  • 50g (3/8 cup) ground almonds
  • 50g (3/8 cup) flour
  • ¼ Teaspoon of baking powder
  • a few drops of almond flavour or essence (we have Bittermandel-Öl in Germany)
Icing:
  • 175g (1½ cups) icing sugar
  • 1-2 Tablespoons of water
  • 12 glace cherries
Instructions
Pastry:
  1. Rub butter into flour and sugar until it resembles fine breadcrumbs.
  2. Add the egg yolk and cold water one teaspoon at the time until dough comes together.
  3. Wrap in cling film and store in fridge for at least 30 min.
  4. Meanwhile prepare your muffin tin by greasing all molds with butter or margarine.
  5. Take dough out of the fridge and devide into 12 portions. Line the muffin molds with pastry dough by rolling every portion into a circle big enough to fill it or devide each portion into 2, shaping one into a snake that covers the sides of the muffin mold and one into a ball and press it down to form the bottom. Shape the dough with your fingers into pastry cups.
Filling:
  1. Preheat your oven to 180°C.
  2. Spoon 1 teaspoon of strawberry jam (or any other kind you like) into each pastry cup.
  3. Cream together butter and sugar until fluffy. Add the egg and mix until well incorporated.
  4. Put flour, baking powder, ground almonds and almond flavour into the bowl and stir well.
  5. Devide the mixture between the 12 pastry cups and make sure that the jam is completely covered.
  6. Bake your Cherry Bakewells for 20 minutes until golden.
  7. After taking them out of the oven press the filling mixture softly back down again with the back side of a spoon to form a little mold for the icing. Let the bakewells cool down before taking them out of the muffin tin.
Icing:
  1. Mix icing sugar with the water (don't put it all in at once, just add little by little until you have a thick white glace) and spoon on top of the bakewells. Top each tart with a glace cherry as long as the icing is still wet.
  2. Let the Cherry Bakewells completely cool down and enjoy!
Notes
They freeze very well - just take them out of the freezer and let them come back to room temperature!

Cherry Bakewell Tarts by ginger, lemon and spice

What are you waiting for? Get Baking!! 🙂

Love,

~ Kathrin

Around The World: Ireland – Barmbrack

Around The World: Ireland – Barmbrack

Lá fhéile Pádraig sona dhaoibh!

Happy Paddy’s day to all of you!!


Around The World, Week by Week: Ireland - IRISH BARMBRACK by gingerlemonandspice


This is actually the last recipe of Irelands feature in the Around the World, Week by Week series!

I hope you enjoyed the week, learned something new and continue to challenge your tastebuds by trying out something unknown and from a different food culture!!


I do have some pictures here from some of my previous trips to Ireland, so sit back and enjoy the little slideshow. Maybe I made you wanna go and visit this beautiful country now yourselves? 🙂

By the way, all the pictures are non-photoshopped, just like it was when I took them! You’ll never know in Ireland, the weather changes a lot over there 😉


As always, leave me your comments below, I need some interaction with you guys!!! 😀


Tell me what you think about the series, the recipes; have you made your own experiences with food, culture or people?


Around The World, Week by Week: Ireland - IRISH BARMBRACK by gingerlemonandspice


 The Irish Barmbrack bread is usually baked and eaten around Halloween time. It is full of Irish tea soaked dried fruit and spices and just tastes heavenly!!

I really couldn’t wait to have my first slice until I finished shooting, the smell was incredible and that I didn’t had breakfast yet really didn’t help either 😉

Traditionally they are several symbolic things baked into a loaf of Barmbrack:

– a coin, which meant you would enjoy good fortune or be rich
– a pea which meant the person would not marry that year
– a small piece of cloth to forecast poverty
– a stick, the person would have an unhappy marriage or continually be in disputes
– a ring, to foretell marriage within a year

Also it was important that only the baker was allowed to slice the bread and divide it amongst the people!!

As the Barmbrack has no butter in the bread itself it is served slatherd with some good Irish butter.

Around The World, Week by Week: Ireland - IRISH BARMBRACK by gingerlemonandspice


Irish Barmbrack
 
Prep time
Cook time
Total time
 
Author:
Recipe type: Sweet Bread, Cake
Cuisine: Irish
Serves: many
Ingredients
prepare fruit (best the night before)
  • 400g dried fruit (I used raisins, dried pineapple, cranberries and mixed peel)
  • 300ml hot Irish black tea
  • 50ml Jameson Whiskey
dough
  • 250g flour
  • 125g brown sugar
  • 2 tsp baking powder
  • 1 tsp cinnamon
  • ¼ tsp clove
  • ¼ tsp nutmeg
  • 1 egg
  • 1 heaped tsp dried orange zest
Instructions
  1. Chop the dried fruit if necessary so that everything is the size of the raisins. Put in bowl, cover with tea and whiskey and let soak overnight. If it's too late for that, let it at least soak for an hour!
  2. Put the fruit into a sieve but save the tea/whiskey liquid.
  3. Prepare a loaf tin: coat with butter and line with a stripe of baking paper for easy lifting. Preheat oven to 170°C (325° F).
  4. For the dough put all the dry ingredients into a bowl and mix a bit with a wooden spoon. Add the egg and the retained liquid from soaking the fruit. Mix until combined. The dough should be quite wet!
  5. Now add the fruit and fold in. Be careful to not break it up too much.
  6. Put the dough into the loaf tin and bake in the oven for 1 hour.
  7. The Barmbrack is ready when an inserted wooden skewer comes out clean (no unbaked dough)!
  8. Let cool completely then slice up generously (a bread slicing machine worked perfect) put some butter on top and ENJOY!!
Notes
The Barmbrack even tastes better the next day!

Around The World, Week by Week: Ireland - IRISH BARMBRACK by gingerlemonandspice


Here are the other recipes I shared during this series:

Breakfast – Irish Scones with Raisins

Fast Food – Egg Salad Sandwich & Crisps

Drink – Jameson Whiskey with Ginger Ale

Soup – Seafood Chowder

Main Dish – Irish Stew with Guinness

Dessert – Fruit Crumble


Bain Sult As!  Slán!

Kathrin

Around The World, Week By Week: IRELAND & Irish Scones

Around The World, Week By Week: IRELAND & Irish Scones

Hello everybody!

It has been some time, since I last posted and a lot of things have happend, but I hope you’re still out there somewhere and ready for a new week of AROUND THE WORLD, WEEK BY WEEK!!

Around The World, Week by Week: Ireland -  Irish Breakfast Scones by gingerlemonandspice

As I told you already in this post and another one including a recipe for delicious Brown Soda Bread, IRELAND feels kind of like my second home. When the plane sinks through the clouds and I get a first look of the green fields surrounded by the dark stone walls covered with blackberry bushes I feel very calm and excited all at once.

Ireland from gingerlemonandspice.com

I have been to the green isle already so many times, I just lost count –  I guess it might be around 15 times or so, but thats definitly not the final number.

It is no surprise then, that I chose this country to be the second one featured in the Around the World series!

Ireland by gingerlemonandspice.com

The Republic of Ireland is an island located in the north west of Europe and surrounded by the Atlantic Ocean. Wikipedia tells me, that the population of the isle is about 6.4 million whilst 4.6 million people live in the Republic of Ireland and 1.8 million people in Northern Ireland, which belongs to the United Kingdom of Great Britain. Especially in the south the effects of the gulf stream can be seen in a very mild climate which allows even palm trees to grow in some places! The island is known for its very green appearance due to the big amount of rain that comes down, compared with other countries.


I think thats enough talk for right now, I have the whole week to talk about the country and don’t want to tell you all at once 😉

Around The World, Week by Week: Ireland -  Irish Breakfast Scones by gingerlemonandspice

Since in Ireland there isn’t a special tradition of serving appetizers or other food before the main course (which should usually be the category of the first recipe in the series) I thought I might share with you some info about what the Irish eat for breakfast!

So here it comes 🙂

Actually there is a dish that is called a ‘Full Irish Breakfast’, but I am not able to shoot any pictures of my own of it because it is nearly impossible for me to get those ingredients in Germany! It contains baked irish small sausages, bacon, tomatoes, irish black pudding (a kind of blood sausage), mushrooms, fried eggs and baked beans! Of course buttered toast can’t be missed with this! If you want to have a look how its done look at Donal Skehan’s page and see how a real irish fella makes his ‘Full Irish’!

Of course this dish is more of a special breakfast on weekends as it takes some time to prepare and is a bit heavy on the calories for an everyday breakfast too.

Around The World, Week by Week: Ireland -  Irish Breakfast Scones by gingerlemonandspice

On a usual school day people prefere to eat porridge (a warm pudding of oats and milk or water with sugar and maybe fruit) or some kind of scones with butter, cream and jam. And this is what I have for you!

Scroll down for my recipe for Irish Breakfast Scones with Raisins!


Irish Breakfast Scones with Raisins
 
Prep time
Cook time
Total time
 
A perfect and quick to make scone recipe which pleases everyone! Yummy scones for breakfast, teatime or any time of the day with an incredible easy recipe!
Author:
Recipe type: Breakfast, Teatime
Cuisine: Irish
Serves: 12
Ingredients
  • 450 g flour
  • 1 sachet baking powder (1 Tbsp)
  • 50 g sugar
  • 50 g softened margarine
  • a pinch of salt
  • 300 ml milk
  • 100 g of raisins
Instructions
  1. Preheat oven to 220° C.
  2. Mix all the ingredients together, except the raisins, they should be added last. I just use a fork to work the dough. It should still be wet but dry enough to handle!
  3. Just use two tablespoons to form big balls and put them on a baking sheet covered with baking paper.
  4. Bake the scones for 12-15 minutes. They are ready if the top and bottom is golden - don't bake them too long! Enjoy 🙂
Notes
You can leave the raisins out if you don't like them or substitute with nuts or other dried fruits! Serve the scones with butter, whipped cream & jam! In the pictures I served them with lemon curd.

You can find my recipe for Creamy Lemon Curd here!


Around The World, Week by Week: Ireland -  Irish Breakfast Scones by gingerlemonandspice

Here are the other recipes I shared during this series:

Fast Food – Egg Salad Sandwich & Crisps

Drink – Jameson Whiskey with Ginger Ale

Soup – Seafood Chowder

Main Dish – Irish Stew with Guinness

Dessert – Fruit Crumble

Pastry – Barmbrack Sweet Bread


 ~ Kathrin


Easy Low Fat Apricot Cake

Easy Low Fat Apricot Cake

Hey there!

I wrote another guest post about this Pretty Low Fat Apricot Cake!

Easy Low Fat Apricot Cake

I did it last weekend, when we had such a nice weather and I was at my parents for the weekend. They have a beautiful backyard with hammock and all and I took the chance and made the pictures outside! I just looove them 🙂

Easy Low Fat Apricot Cake

Later that day I took a big slice of that cake and ate it in the hammock, with my godchild and her friend next to me. What an awesome lazy sunday!!

Easy Low Fat Apricot Cake


Hop over to Rants From My Crazy Kitchen or scroll down to see the recipe!


Easy Low Fat Apricot Cake
 
A light and delicious summer cake that's easy and quick to make - a win-win!!
Author:
Recipe type: Cake
Serves: 12
Ingredients
  • 850g (1.8 lb) of fruit (canned or fresh apricots or peaches, I used homemade canned peaches)
  • 3 eggs
  • pinch of salt
  • 6 tablespoons lukewarm water
  • 100g (1/2 cup) sugar
  • 1 teaspoon lemon zest
  • 150g (1¼ cups) flour
  • 1 teaspoon baking powder
  • 1 tablespoon powdered sugar
Instructions
  1. Prepare the fruit: Drain with sieve if it’s canned, or wash, peel and cut in big chunks if fresh. Preheat oven to 180° C (350° F). Prepare a springform (26cm in diameter) pan with baking paper. Just place the pan on a sheet of baking paper, circle around the bottom and cut it out. Butter the pan and place the circle of baking paper on the bottom.
  2. Separate the eggs into two different bowls. The bowl with the egg whites has to be completely clean and fat free otherwise the whites won’t get stiff! Beat the egg whites with the salt and an electric mixer until they form stiff peaks.
  3. Then beat the yolks with the sugar until creamy. You don’t have to clean up your beaters if you do it in that order! Add the water and whisk on very slow speed.
  4. Add lemon zest, flour and baking powder and mix well. Then add the egg whites and whisk carefully per hand. Don’t overmix!! It should just be incorporated!!
  5. Pour the batter into the pan and distribute the fruit on top. Bake for 25 minutes.
  6. Let the cake cool for 10 minutes then remove the pan and sprinkle with powdered sugar. Let cool completely and enjoy!!
Notes
I used my mom’s springform pan and hers is 28cm in diameter. Because that’s a little bigger I had 4 eggs and adjusted the rest of the ingredients accordingly!


Easy Low Fat Apricot Cake


Have a great week!!

~ Kathrin

Braided Yeast Bread with Walnut Filling – Hefezopf mit Walnussfüllung

Braided Yeast Bread with Walnut Filling – Hefezopf mit Walnussfüllung

Hey folks! 

Always wanted to say that 😀

Braided Yeast Bread with Walnut Filling – Hefezopf mit Walnussfüllung by gingerlemonandspice

Well here I am with a great new recipe for you: It is a yeasted and braided bread with a filling of ground walnuts (from our own tree in the backyard!!)! It is sooo pretty and tastes incredibly good! You can’t stop eating once you started 🙂

Braided Yeast Bread with Walnut Filling – Hefezopf mit Walnussfüllung by gingerlemonandspice

I made this braid with my godchild because she wished for it as she had never done one before. You see, I can’t see here as often as I want to because I live and study in another city but I really wanted to make her wish come true! So we made a date and just started baking 🙂 It was awesome!! I really enjoyed the time being with her and doing stuff I love and makes her happy too! 🙂 We were very proud of the outcome and I’d say we were right to be!!

I took a lot of pictures to show you every step of how it’s done! But because I didn’t want you to have to scroll over soo many pictures until you finally reach the recipe I installed a little feature: A slideshow!! Hope you like it 🙂

And here is the recipe:

Braided Yeast Bread with Walnut Filling
 
Prep time
Cook time
Total time
 
Elegant, soft and yummy yeast bread that is perfect for any coffee table!
Author:
Recipe type: Sweet Bread
Cuisine: German
Serves: about 12
Ingredients
Dough
  • 500g (4¼ cups) flour
  • 1 sachet of dry yeast
  • 1 pinch of salt
  • 50g (1/4 cup) sugar
  • 50g (1/4 cup) butter, softened
  • 200ml (3/4 cup) lukewarm milk
Filling
  • 150g (1¼ cup) grounded walnuts
  • 75g (1/3 cup) sugar
  • 1 tablespoon vanilla sugar (or 1 teaspoon extract)
  • 1 tablespoon bread crumbs
  • 6 tablespoons cream
  • 1 egg white
  • if you want: apricot marmelade
Finish
  • 1 egg yolk
  • 1 tablespoon of milk
Glaze
  • 40g (1/3 cup) powdered sugar
  • about 1 teaspoon milk or lemon juice or mixture of both
Instructions
Dough
  1. Put flour, dry yeast, salt and sugar into a bowl and mix. Put softened butter in flakes on top. Slowly add warm milk and mix with a dough hook on an electric mixer. When it pulls of the bottom of the bowl take the dough out on a floured surface and knead with your hands for 5 minutes. Put it back into the bowl and cover with a kitchen towel. Let it sit on a warm place until it doubles in size (about 30-45 minutes).
Filling
  1. Mix walnuts, sugar, vanilla, bread crumbs, cream, egg white and if you prefer some apricot marmelade to taste.
Assembling
  1. Roll out your dough on a floured surface. You can make it as thick or thin as you like. If you prefer your filling more evenly distributed make it thinner and if you want a thicker layer of filling do it thicker.
  2. Cut the dough into 3 parts lengthwise. Distribute the filling on all three parts, then roll up each one individually from the larger side. Now you have your three strings and you can start braiding from the middle to each side (look on the fotos for reference). Hide the ends underneath the braid and put the whole thing onto a baking tray that's layered with baking paper.
  3. Let it sit covered with the kitchen towel in the warm place for another 30 mins.
  4. Preheat oven to 180° C (350° F).
Brushing
  1. Mix the egg yolk with the milk and brush it on top of the braid. Bake for about 35 minutes.
  2. Your braid is finished when the top (and bottom) are golden brown and a wooden skewer inserted into the middle comes out clean.
Glaze
  1. Mix powdered sugar and liquid (little by little!! until you have the consistency you want) and brush on top of hot braid. Let cool and Enjoy!!

Braided Yeast Bread with Walnut Filling – Hefezopf mit Walnussfüllung by gingerlemonandspice 

Have a great day!!

~ Kathrin

Cheese & Cream Cake with Strawberries and Oreos – Käsesahne-Torte mit Erdbeeren und Oreos

Cheese & Cream Cake with Strawberries and Oreos – Käsesahne-Torte mit Erdbeeren und Oreos

Hello everybody!!

I am so very sorry that it took me so long to get back in posting mood! I had so much stress and worries about university that I couldn’t really think about the ‘nice’ things in life – like updating this food blog, that I have grown to love so much 🙂

Well things with university are still not sorted out and I have to wait until the beginning of next month to get notice if I will be allowed to keep on studying or if I have to quit. This is very nervewracking and it seems to take forever!!

Cheese & Cream Cake with Strawberries and Oreos – Käsesahne-Torte mit Erdbeeren und Oreos from gingerlemonandspice.com

After the first shock and some time of despair when I received the news I am back to seeing things positivly and try not to think about it all the time. In the last weeks I was barly cooking and did no baking at all – that’s how you can see how serious this was! Also I was sick quite some time with a stomach flu, I guess all the stress before just caught up on me…

That’s just how live goes I guess – with all its up and downs…

Cheese & Cream Cake with Strawberries and Oreos – Käsesahne-Torte mit Erdbeeren und Oreos from gingerlemonandspice.com

But I finally brought you something, you all have been waiting for a long time: My mother’s day cake!! It is a creamy and not too heavy Cheese & Cream Cake filled and decorated with strawberries and oreos!! ‘Käsesahne-Torte’ as it is called in Germany is liked very much here. It is a traditional!! Usually it looks quite different, but I gave it my own little twist and spiced it up a bit for the special occasion. Also I like decorating cakes and I don’t get the chance often, so I had to do that too!! 😉 The traditional German Käsesahne-Torte only has one layer of filling and has mandarin oranges and no strawberries or oreos. But that wasn’t fancy enough for me 🙂

You can find the rest of my mother’s day meal here: Steak, Grean Beans and Hasselback Potatoes.

Cheese & Cream Cake with Strawberries and Oreos – Käsesahne-Torte mit Erdbeeren und Oreos from gingerlemonandspice.com

I guess you have waited long enough! Here it comes! Just give it a try yourself, you won’t regret it, it is very yummy 🙂


Cheese & Cream Cake with Strawberries and Oreos - Käsesahne-Torte mit Erdbeeren und Oreos
 
Prep time
Cook time
Total time
 
A cake perfect for mothers day or any other fancy occation! Easy and quick to make - just needs a little time to set.
Author:
Recipe type: Cake (Torte)
Cuisine: German
Serves: 12
Ingredients
Cake Base
  • 5 eggs
  • 5 tablespoons of water (lukewarm)
  • 250g (2 cups) flour
  • 250g (1⅛ cups) sugar
  • 1 sachet of baking powder (1 tablespoon)
Filling
  • 10 sheets of gelatine + cold water for soaking
  • juice of one lemon
  • 100ml (1/2 cup) water
  • 150g (2/3 cup) sugar
  • 500g (18 ounces) of curd cheese (Quark)
  • 500g (17 fl.oz) cream, whipped
  • 15 Oreos
  • 400g (14 ounces) fresh strawberries
Instructions
Cake Base
  1. Preheat oven to 160° C (325° F).
  2. Butter a 28 cm (11 inches) springform pan and line the bottom with baking paper. For this you just put the pan on top of a sheet of baking paper and trace the pan and then cut it out and put on botton of buttered pan!
  3. Beat eggs with water in a bowl until foamy. Add sugar and beat until white, thick and creamy. This takes time! It has to be really creamy! Add flour and baking powder and mix gently until just incorporated. Pour into springform pan and bake on the middle rack for about 20-25 min. Insert skewer to see if it is ready! Skewer then comes out clean when put into the middle of the cake.
Filling
  1. Put gelatine in a small bowl of cold water and soak for 10 min.
  2. Meanwhile heat up sugar, water and lemon juice in a pot on the stove on medium heat. It doesn't have to boil. Take the gelatine out of the water and press gently and then dissolve in the warm liquid.
  3. Stir the curd cheese in a bowl and add the gelatine liquid. Mix until incorporated. Add the whipped cream and mix gently. Reserve ⅓-1/2 of the mixture. Pour it into a box or bowl and cover tightly and put in refrigerator.
  4. Wash strawberries. Reserve 12 pretty small strawberries and 6 oreos for decoration and cut the rest into bits.
Assembling
  1. Take your cake base and cut twice horizontally. Take a plate and put 3 stripes of baking paper in form of a triangle on top. When you put the bottom cake base on top the borders should be sitting on the paper! You can later remove them easily and still have a clean plate! Place a cake ring around the cake base and adjust it to the cakes size.
  2. Half the rest of the filling. Use one batch for the first layer: Distribute just a little bit of the filling on the cake base - just a thin layer. Add half of the cut strawberries and oreos. Make it kind of even and cover with the rest of the first half of the filling.
  3. Now put the middle piece of cake base on top. Repeat the filling layer like you did the first time!
  4. Place the top piece of cake base on top and press down gently. Refrigerate the cake for at least 2 hours, the best is overnight.
Decoration
  1. To finish up the cake loose up the cake ring and remove it carefully. Take the leftover filling out of the fridge and whisk it until it is fluffy again. It will not be as creamy as the day before, but with patience and taking little by little you will be able to cover the whole cake. If you are not known for your patience you could still just use all the filling actually to fill the cake and just frost the cake with some whipped cream with whipped cream stabilizer.
  2. Decorate the cake like you want, you can see how I did it on the pictures 🙂 Remove baking paper stripes and put the cake back into the fridge until you are ready to eat it! Earn a lot of uuuhs and aaahs for all the work you've done! 🙂
Notes
Cake Base can be made a day ahead without any problem! Just wrapp in cling film! You can also use a 26 cm (10.2 inches) sprinform, then you need only a cake base made of 4 eggs (you have to cut down the rest of the ingredients accordingly). If you really can't find curd cheese you could use cream cheese, but you might need a little more liquid in your mix. Traditionally the German Käsesahne-Torte only has one layer of filling and is filled with mandarin oranges. It is not frosted on the outside, just sprinkled with powdered sugar on top!

Cheese & Cream Cake with Strawberries and Oreos – Käsesahne-Torte mit Erdbeeren und Oreos from gingerlemonandspice.com

Bon appetit!

~ Kathrin


Recipe admitted to Gewinnspiel Erdbeerzeit from Party Princess Blog!

Erdbeer-Gewinnspiel_2501

Mini Pavlovas with Lemon Curd, Raspberries and Chocolate

Mini Pavlovas with Lemon Curd, Raspberries and Chocolate

Hello everybody!!

My very first giveaway is over and very soon  this cute and roomy Apple Pouch will be sent to a new owner!

Who is it you ask?

I used random.org to draw the lucky winner: Congratulations to Ariane from arifra83!! 

Apple Pouch Giveaway by gingerlemonandspice

She said she would use this pursie to store all the small things a woman needs during a day  🙂


But all of you that weren’t so lucky – don’t be sad!! There will be another giveaway sometime for sure! And for now you can take a teensy bit of your time and make those tender and delicious Mini Pavlovas. They aren’t difficult to make but look  and taste so decadent and sophisticated! A very special treat for you or your loved ones. Or make them for your mother on mother’s day?

Donal Skehan's Mini Pavlovas with Raspberries, Chocolate and Lemon Curd by ginger, lemon & spice


Mini Pavlovas

adapted from Donal Skehan

Donal Skehan's Mini Pavlovas with Raspberries, Chocolate and Lemon Curd by ginger, lemon & spice

Donal Skehan's Mini Pavlovas with Raspberries, Chocolate and Lemon Curd by ginger, lemon & spice


Ingredients:

Meringue:

250g powdered sugar

4 egg whites (maybe left from making Creamy Lemon Curd?)

2 teaspoons corn flour

1 teaspoon white vine vinegar (I used white balsamico)


Filling:

500g cream, whipped (if you like with some cinnamon)

250g raspberries and/or optional lemon curd (I had bananas with the lemon curd version)

Chocolate shavings*

Donal Skehan's Mini Pavlovas with Raspberries, Chocolate and Lemon Curd by ginger, lemon & spice


Directions:

1. Preheat your oven to 150°C and put baking parchment on two or three baking trays. Then place the sugar and the egg whites in a bowl and mix until white and stiff. This takes at least 10 minutes! Lucky you if you have a stand mixer, if not take some patience and use your electric hand mixer 🙂 The mixture is ready if you can form peaks and they stay stiff! Fold in corn flour and vinegar gently with a rubber spatula.

2. Take about one tablespoon of the mixture, put it on a baking tray and flatten out a little. This is your first mini disc! Repeat until all the batter is used up. You should have about 14-16 discs. I made mine a little on the very flat site, I guess you could leave them a little thicker and use only 2 discs to make the staples later!

3. Bake them for 45 minutes and then open the door of the oven a little and let them cool down completely. Meanwhile prepar the filling!

4. Assamble the Mini Pavlovas by stacking a meringue disc, a tablespoon of cream and some raspberries and maybe some lemon curd and repeat. I made two different kinds – One with cinnamon cream and raspberries and one with plain cream, bananas and lemon curd. Sprinkle the chocolate shavings on top!

5. Enjoy immediately after snapping a picture or two 😉

Donal Skehan's Mini Pavlovas with Raspberries, Chocolate and Lemon Curd by ginger, lemon & spice

* How to make chocolate shavings:

Take one bar of dark chocolate and a very big knife. ‘Shave’ the chocolate from the bottom of the chocolate bar with the big knife. For some people it is easier to press the chocolate liying on a table with one short side to their belly and shave towards their body. It would be good to wear a clean apron if you try this 🙂

This is a video which shows kind of what I mean: http://www.youtube.com/watch?v=K6NjcsdvgwM

Have fun trying this yourself!

Donal Skehan's Mini Pavlovas with Raspberries, Chocolate and Lemon Curd by ginger, lemon & spice

~ Kathrin

Ratz-Fatz-Streuselkuchen – Birthday Cake No. 3

Ratz-Fatz-Streuselkuchen – Birthday Cake No. 3

Hello Everybody!

Ratz-Fatz Streuselkuchen. crumble/streusel cake from gingerlemonandspice

Finally you get to see the recipe for my 3rd birthday cake. It is kind of the signature cake of my godmother and I begged her for the recipe! 🙂 My other birthday cakes were Buttermilk Banana Bread and Cherry Chocolate Cake!

And now I am sharing it with you!! This cake really is a crowd pleaser! Everybody loves it – it is so simple and yet sooo delicious!!

Ratz-Fatz Streuselkuchen. crumble/streusel cake from gingerlemonandspice

You can get streusel cake at nearly every bakery in Germany and this one just looks like it. You will get asked if you are a professional baker a lot of times 😉

But here is the secret: The cake is not actually very difficult to make! You might even have all those ingredients in your pantry already. Just make it yourself!


Ratz-Fatz Streuselkuchen / Streusel Cake / Crumble Cake

Ratz-Fatz Streuselkuchen. crumble/streusel cake from gingerlemonandspiceRatz-Fatz Streuselkuchen. crumble/streusel cake from gingerlemonandspice


cake base:

4 eggs

200g (a little less than 1 cup) sugar

200g (1 3/4 cup) flour

1 teaspoon baking powder


streusel:

250g (1 1/8 cup) butter, softened

250g (1 1/8 cup) sugar

400g (3 1/3 cups) flour

1 package vanilla sugar or 1 teaspoon extract


for the finish:

200g (7 oz) cream

powdered sugar


Directions:

1. Preheat oven to 180° C (350°F). Line one baking sheet with baking paper.

2. First prepar the cake base: Beat eggs and sugar with a hand mixer until foamy. Add flour and baking powder and mix until incorporated. Pour onto the baking sheet and smooth out with a pastry spatula.

3. Now prepare the streusel. You need dough hooks on your hand mixer now or you could use your hands! Put butter, sugar, flour and vanilla into a bowl and mix. This takes about 5 minutes until everything is evenly distributed. Put the mixer away and press the streusel to small lumps together and put on top of the cake base. Try to spread evenly.

4. Bake this cake for approx. 20-25 minutes! You can use a knife to lift up the cake at the corners to see if its done from the bottom. Take it out of the oven and immediately pour the cream evenly on top of the cake. Let the cake rest for at least half an hour. The cream will soak in!

5. Coat with powdered sugar with the help of a small sieve and a teaspoon. Dig in!! 🙂

Ratz-Fatz Streuselkuchen. crumble/streusel cake from gingerlemonandspice

~Kathrin